Diesel Heater Boat Installation
Planning the Install: First of all you need to decide where the unit is going to be sited. As in my other blog regarding Diesel heater Safety, there are many factors to take into consideration regarding a diesel heater boat installation; where you are going to get your combustion air from, where the heating air is coming from and going to, and most importantly where the exhaust will be routed. The path of the fuel line is another consideration that must be addressed as once you’ve decided whether to use the plastic fuel tank supplied with the unit or whether you are going to run from your main diesel tank, (If you do in fact have a diesel tank), you will need to plan the route of the fuel line. You will want to place the fuel pump as close as practical to the heater unit for best results and the fuel pump will need to be sited at an angle of approximately 45 degrees. The fuel pump can be quite noisy when the heater is running and you may also want to take this into account when siting the pump.
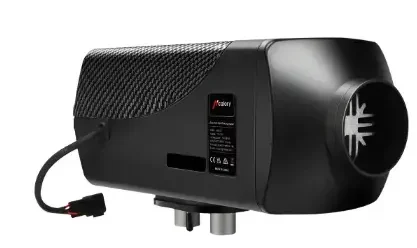
Unpacking the box: In here you will find the diesel heater, a couple of lengths of ducting and a Y piece to divert the outgoing air in two directions if required, plus an assortment of hose clips and P brackets. There are two sizes of hose clips; one for the fuel hose and another for the exhaust and air inlet hose. As I’ve mentioned in previous blogs you may want to swap these out for more robust stainless steel hose clips. Also check the fuel line, if it is the soft green coloured type then you should also swap this out for the opaque hard plastic line. There are links to these items on my resource page. There is also a short 60cm length of flexible exhaust pipe and a small silencer. Important: do not use the silencer on a diesel heater boat installation, you will need a special skin fitting for diesel heater exhaust (resources page). The silencer is for a vehicle where the exhaust has been routed outside and has a small hole in the bottom to let any condensate out but this will also let out carbon monoxide and if it were in the accommodation are could cause carbon monoxide poisoning and even death.
Preparing the area: Once you have decided on the location of the unit and how it will be orientated, the normal position would be outlets to the bottom, however it can operate on its side as long as the wiring loom is coming out of the top of the unit. You will need to cut a hole for the inlet and outlet pipes. I used a hole saw to cut a 125mm hole through the shelf that I intended to fit my unit to. I then offered it up to the shelf to determine what length of exhaust I would require. In my case I went for a 200cm length of exhaust pipe. While I waited for it to arrive (next day delivery from Amazon, yes you’ve guessed it on my resources page), I prepared a little extra thermal protection. I cut a sheet of fireboard (a fireproof fibreboard) so that it fitted inside an old baking tray that was about 20mm deep. I then cut another 125mm hole through the baking tray and fireboard to match the hole in the shelf. Once this was done I surrounded the hole in the wooden shelf with layers of heat reflective tape so that there would be no thermal conductivity between the hot exhaust and the wooden shelf.
Alternative Method: There is a turret mount available for between £20 and £30 if you wanted to do without the baking tray method. However I prefer my method as the fireboard sandwich gives me more confidence regarding heat transference.
Fitting the Exhaust: Before bolting the unit to the baking tray and shelf it is prudent to carefully unfurl the exhaust (too much bending and flexing and it will lose its integrity and leak exhaust fumes), it should then be formed into the shape it will need to be once fitted. Then attach it to the outlet port on the heater unit. Apply plenty of exhaust putty as if it leaks it will all have to come apart again and have all the joints cleaned and resealed. Once the exhaust is in place and the hose clip tightened, attach the air inlet hose and the fuel pipe. The exhaust outlet is the one furthest away from the fuel pipe (although there’s not a lot in it). There is a thicker rubber hose in the installation kit that needs to be cut into lengths of approximately 30mm. These attach to the heater unit and fuel pump with the smaller fuel pipe inserted into it (I soaked the outer hose in hot water before trying to insert the smaller hose). I then tightened up the hose clamps on each joint including the heater and fuel pump.
Attaching the heater unit: Once all the hoses are secured to the heater, feed the hoses and pipes through the hole in the baking tray, fireboard and shelf. Bolt the heater unit to the baking tray and shelf assembly. Fix the shelf in place and then you can route the exhaust and fuel lines. In my case, as the heater was in a clean air environment, the short length of air inlet hose that was supplied was adequate. However depending on your situation you may need to get a longer length of hose to source clean air from another location.
Fixing the exhaust: When you have the exhaust routed to the overboard skin fitting, you will need to make sure that it is secure and won’t get knocked or vibrate too much with the movement of the boat. If you use the P brackets supplied in the installation kit then I suggest that you first insulate the exhaust with either exhaust bandage of a fibreglass lagging sleeve in my resources page. If you use the sleeve don’t forget to put it on before attaching to the skin fitting. Be aware that when you first run the unit the exhaust lagging will smoke quite profusely, this is nothing to worry about, just open the windows and try to ventilate as best you can as this should only last for a few minutes. When the lagging has stopped smoking, place a carbon monoxide monitor at the joint where the exhaust meets the skin fitting and where it joins the heater unit, to ensure the joints are not leaking.
Wiring: Obviously before you can get to the stage of running the heater you will have to connect the wiring. The wiring is pretty straight forward. There is a main wiring loom plug that attaches to the heater. On the other end, another plug connects to the control unit and another plugs into the fuel pump. They are two different fittings and cannot be mixed. This will then leave you with a positive and negative pair with no plug which you can then wire into your 12 volt supply. Bear in mind when choosing the source for your 12 volt supply that it must not be wired to the engine ignition, because once you have finished with your heater it needs to go through its shut down process, which involves a cool down period with the fan running until it reaches a safe temperature. Cutting the power during this period will damage the unit.
Additional Safety: I do not leave the heater running if I am not in attendance. I don’t leave it running while we are sleeping and I also have 2 carbon monoxide monitors at the potential areas where any exhaust leakage may occur. Please check out my other blog on Diesel Heater Safety.
I hope that this Installation Guide is of some assistance to you. Good luck and happy boating.
Pingback: Chinese Diesel Heater Pros and Cons - BoatStuff.info